With the HereNOW Help Calendar, you can quickly schedule meetings and get reminders about upcoming meetings so you always know what’s next. Calendar is designed to make your day-to-day easy to manage, even when you are remote. Let’s get started by setting up your first event!
Skip ahead to
Calendar Basics
Create your first meeting
-
With your hereNOW app open, tap on the calendar icon (
 ). You will arrive at the default calendar view (Day View).
 -
Tap on the Create new button:

-
You will arrive at the Create event screen.

You can now add event details like:
– Name
– Date & time
– Frequency
– Rooms, location, or online conference link
– Guests (HelpNOW members only)
– Notes -
Enter your event details. If they are stored on the provider’s network, you will see suggestions auto-populate. When you’re done editing, tap Save to finish creating your event.
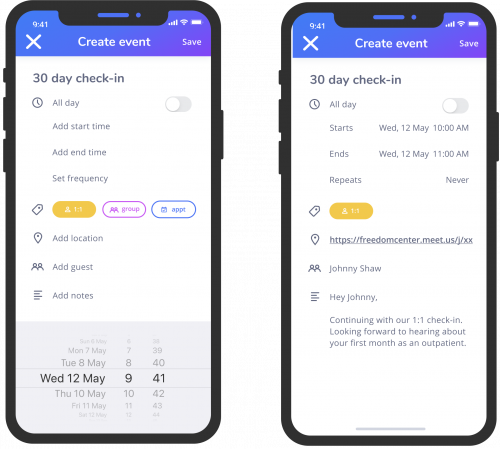
- Tap Create another event to do so, or tap Done to return to your calendar. Your new event should now appear in your calendar.

Create an event by tapping an empty time
-
With your HereNOW app open, tap on the calendar icon (
 ).
). -
Tap anywhere on the empty timeline to create a new event.

-
On the Create event screen, enter your event details. If they are stored on the provider’s network, you will see suggestions auto-populate. When you’re done editing, tap Save to finish creating your event.
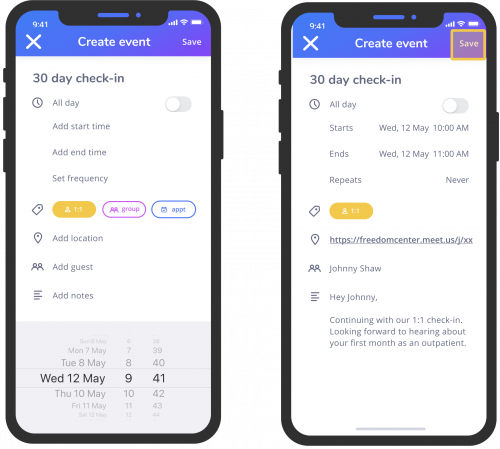
-
Tap Create another event to do so, or tap Done to return to your calendar. Your new event should now appear in your calendar.

Invite guests
HelpNOW members can invite guests to meetings, in addition to creating events.
-
From the Create event screen, tap on the Add guest icon or label:

-
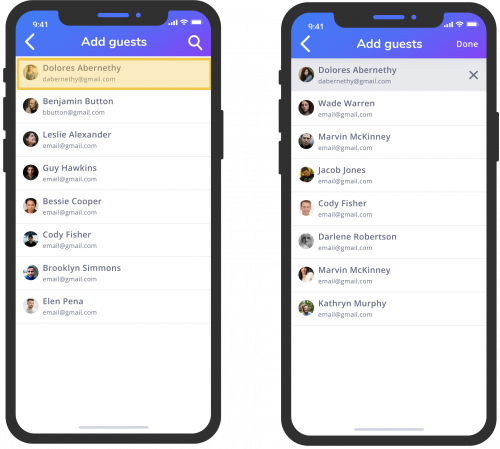
By default, Calendar will show you your most recent contacts. To add a guest from the list, select the guest. Their name will be highlighted in grey, meaning that they have been added to the meeting.
-
To add multiple guests, keep selecting guests. To remove any guest, tap on the X button next to their name.

-
When you are done selecting guests, tap on Done to save the guest list.
-
You can now resume completing the rest of the fields in Create event.

Respond to & manage events
Respond to an invitation from notifications
-
When you are invited to an event, you will receive a push notification. Tap on the push notification to view Invite details. Here you can review the details of the meeting you got invited to.

-
Let your meeting organizer know if you can attend by selecting Yes, No, or Reschedule at the bottom of the Invite detailsscreen.

Respond to an invitation from calendar
-
From the Calendar home screen, tap on any meeting block with an outline.
NOTE: Outlined meeting blocks are your pending invitations, whereas solid meeting blocks are meetings or events you’ve accepted.
-
You will be taken to the Invite details screen. Let your meeting organizer know if you can attend by selecting Yes, No, or Reschedule at the bottom of the Invite details screen.

Check guest attendance
-
After creating a meeting, you might want to review the status of your invitation. You can check guest attendance by tapping on any event to view Meeting details.
-
Note the response icon next to your guest’s name(s).
Green ( ): Accepted
Yellow ( ): Tentative
Red ( ):Declined
Edit an existing event
-
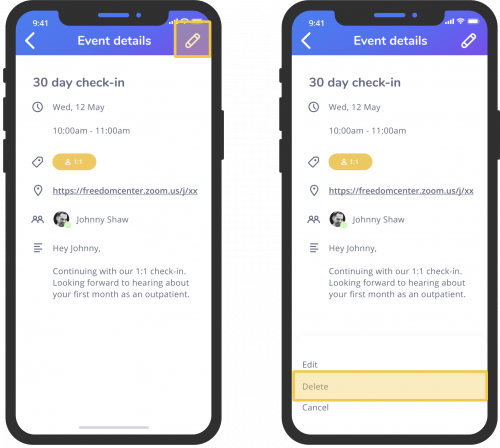
From the Calendar home screen, tap on an event to view Event details.
-
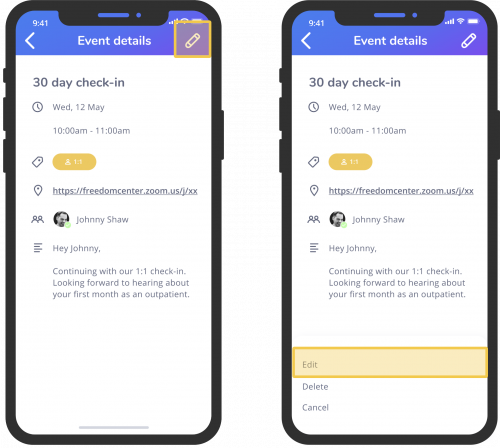
If you created the event, you should see an Edit icon (
 ) on the top right corner of the screen. Tap on it.
 -
the system will prompt you with an option to Edit or Delete the event. Select Edit to begin editing any existing content.
-
Once you’ve updated the event details, tap Save.

Delete an event
-
From the Calendar home screen, tap on an event to view Event details.
-
If you created the event, you should see an Edit icon (
 ) on the top right corner of the screen. Tap on it.
-
the system will prompt you with an option to Edit or Delete the event. Select Delete to delete the event. If you see an alert, tap “Yes” to confirm that you want to delete the event.
Customize your calendar
Choose your calendar view
Calendar offers 3 views: 1) Day view, 2) Week view, and 3) Month view.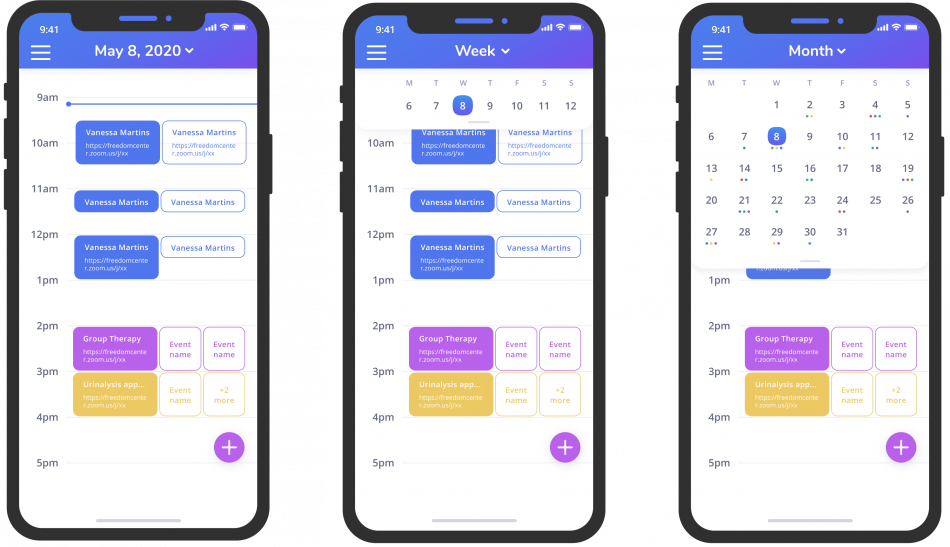
NOTE: The default view in Calendar is Day view.
To change your calendar to Week view: tap on the drop-down icon next to the Date in the navigation bar.
To change your calendar to Month view: tap or drag the grey bar beneath the days of the week.
To return to Day view, tap on the today indicator ( ![]() ) in Week view or Month view. Alternatively, you can re-open Calendar from the bottom navigation bar.
) in Week view or Month view. Alternatively, you can re-open Calendar from the bottom navigation bar.
